Category: Flooring

How To Clean Your Hardwood Flooring

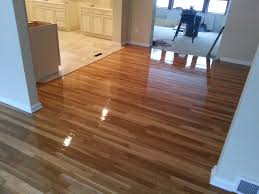
Guide to Wood Flooring Maintenance

Maintenance of wood flooring in commercial buildings is vital to have a safe surface for employees and customers while maintaining the beautiful and sophisticated appearance of the floor materials. Facility and building managers will need to have the proper knowledge and training in regards to the type of flooring that they will clean and service. Here is a simple guide to wood floor maintenance that can be used to prolong the lifecycle of the wood materials while offering preventive advice that can be used to minimize damage.

Daily Maintenance

Deciding on the right daily cleaning services will be based on the type of commercial business that is in operation, the outdoor environment and other factors. You may be in charge of a building that experiences a high amount of foot traffic from employees or customers that requires you to perform nightly sweeping of the surface.

The outdoor environment also plays an important factor. If you are in charge of a resort facility near the beach or has pool access, or a golf course where an abundant amount of dirt from shoes will get onto the surface, you may be required to perform multiple cleaning services throughout the day. Select the daily and weekly schedule that is appropriate for the establishment to lessen the amount of dirt, debris and damage the floor undergoes from commercial business activities.

Most flooring in facilities will require sweeping and spot mopping to maintain the luxurious wood surface. Vacuuming is also ideal on a weekly basis to pull up dirt that may get between the seams of the flooring.

Periodic Deep Cleaning

Deep cleaning usually isn’t recommended on a daily basis. The constant use of cleaners and equipment can quickly strip the finish off the surface, causing the wood floor to become more exposed to dirt, debris and moisture. Only perform periodic deep cleaning on a monthly basis to keep up the eye-pleasing beauty of the wood surface.

Never use any type of harsh cleaners that are recommended for other floor materials such as vinyl or tile. Always consult the wood flooring manufacturer’s instructions in regards to the right cleaning products to use that will not strip the finish from the floor or cause unnecessary wax build-up. Look for hardwood floor cleaners that are specifically designed for wood floors that have a polyurethane finish and contain a low-VOC formula to help with the interior air quality of the commercial establishment.

There are many tools and equipment that can be used to perform periodic deep cleanings such as auto scrubbers, commercial mops and buffers. Always inspect any flooring equipment before use to ensure there are no problems that may end up scratching or marring the surface of the wood floors.


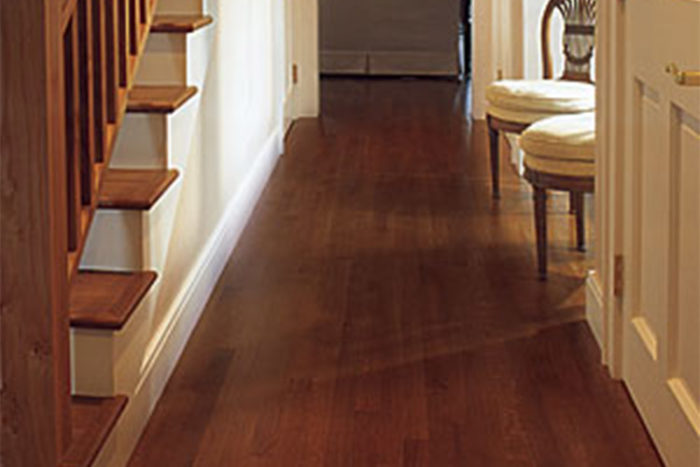
Hardwood floor maintenance is simple.

Hardwood floors will last 25 years between sandings, if they are well-maintained.

Here are 5 tips to help your floors stay in tip-top shape.

  1. Sweep and vacuum your hardwood floors like crazy.

Here in Minnesota, we track all manner of grit, gravel and salt onto our floors. The photo at right in one sweeping of the shop floor on one typical day in January. These particles are abrasive, just like the grit on sandpaper.

Your weight on top of those abrasive particles turns you into a sanding machine that will grind down the finish on your floor as effectively as any floor sander – so get that grit off that floor regularly and often.

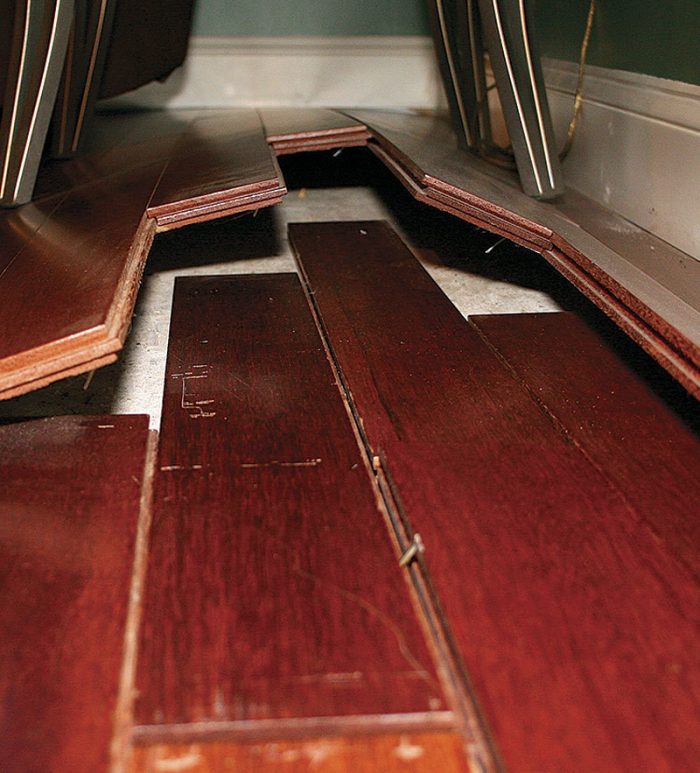
  1. Never, ever steam clean or wet-mop a wood floor. Ever.

Those long-stick squeeze mops just don’t wring out the mop head thoroughly enough, and even small amounts of water can cause your floor to swell and cup over time.

Now, for all you strong, old-fashioned types out there, getting on your hands and knees and washing the floor with a carefully squeezed-out conventional sponge is usually not a hazard to your floor, but we feel bad making your clean your floors that way.

  1. Never wax a polyurethane floor!

You’re looking at your polyurethaned hardwood floor and thinking that it looks dull and dingy and just needs to be polished up a bit. Don’t try it.

Polyurethane is simply plastic and buffing it will just dull it further and laying down a layer of wax will prevent you topcoating with more polyurethane, which is the correct way to restore sheen to your polyurethane floor.

  1. Use rugs.

Place mats at exterior doors to trap sand and grit that arrives with incoming traffic. Use area rugs in high traffic areas and spots where you pivot, like the base of stairwells.

  1. Be careful about rug underlayments.

rug check plusMany people like to use a separate backing under their carpets to add cushion and keep them from slipping.

But synthetic rubber and polyurethane rug backing can react with the plastic in polyurethane floors and discolor and degrade it; natural latex or rubber underlayments will not. But the problem is, manufacturers are not very good about listing the components in their rug underlayments.


How to Clean Hardwood Floors

Learn how to care for hardwood floors by using these natural cleaners and following these simple tips.

Hardwood floors bring an earthy, warm beauty to your home. They’re durable and, with proper care, last for decades. You can keep them looking lovely by following these tips on how to clean hardwood floors.

The first step: Use a dust mop or vacuum to remove dirt, dust, pet hair and other debris that could scratch the floor. Don’t use a vacuum with a beater bar attachment as it could damage the surface of the floor. Use the floor-brush attachment. Depending on traffic and the number of pets and children you have, you’ll need to do this at least once a week.

Dust mopping won’t remove the dirt and grime that build up over time. For periodic deep cleaning, you’ll need to use a liquid cleaner. You can use a commercial wood-cleaning product, like Bona or Murphy’s Oil Soap. Be sure to follow manufacturer’s instructions. You can also make your own cleaner by mixing one part vinegar to 10 parts warm water. Add a few drops of liquid Castile soap.

Whatever cleaner you choose, the process for how to clean wood floors and how to clean engineered hardwood floors is the same. Saturate a rag or sponge mop in your cleaning solution. Wring it out thoroughly so the mop is damp, not wet. Mop the floor with the cleaner, being careful to not put too much liquid on the floor. Rinse the mop with clean water, wring out excess, and damp mop the floor to remove the cleaner. Wipe up excess water with a clean, dry towel because standing water will damage the floor.

You can also use boiling water and two teabags to clean hardwood floors. The tannic acid in tea creates a beautiful shine. Let two teabags steep in the boiling water for a few minutes. Pour the tea into a bucket. Take a soft cloth and wring it out in the tea. The cloth merely needs to be damp, not soaked. This will enable the floor to dry quickly. Wash the floor and be ready to be amazed by the sheen.

Covering scratches that remain after cleaning is part of knowing how to clean a wood floor. Take a crayon the color of the floor and rub it on the scratch to fill the gap. Turn a blow dryer on high, heat the area where the crayon was applied and buff it with a soft cloth.

Prevent dirt and damage to your newly cleaned floors. Put doormats inside and outside exterior doors to cut down on the dirt and moisture tracked in. Avoid scratches by using floor protectors under furniture and putting down rugs in high-traffic areas. Knowing how to clean a wood floor will keep yours looking beautiful for years.


Think You’re Up to DIYing It? Some Tips to Help

Test it. Pick a discrete spot to test your process before you ruin your entire living room. Some chemical- or oil-based cleaning products leave a nasty, nearly-invisible residue, which might bubble to the surface once you start to seal the planks. If anything looks odd during testing, strip your floors using a mixture of ammonia and water, or use a commercial hardwood cleaner.

Skip the stain. Keep your wood natural, then finish it with a water-based polyurethane instead.

The water-based finish dries quickly, which is a plus. It does mean you’ll need to work fast, though, he says. It can start feeling dry to the touch in as little as 15 minutes. If you don’t work quickly, you risk visible overlapping strokes on the finished floor. Not a deal-breaker, but it will look amateurish.

Take your time. Refinishing your floor can take a week or more. A lot of that time will be spent, well, watching paint dry. Pros will let you know how long to stay away and help you seal up the room, but doing it yourself means you’re on your own. It’s best to wait at least 24 hours before touching the floor after each coat of polyurethane, even if it feels dry.

Wear socks — just socks. Shoes, bare feet, and pets can easily ruin all your hard work. So make sure to wear socks during the entire process and for the first 48 hours after the floor is done. In fact, your socks will help buff the floor! Sock race, anyone?


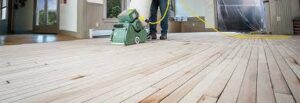
What Are The Steps To Refinishing Hardwood Floors?

Read these 6 steps for refinishing the wood floors in your home:

  1. Clean the Floor with a Hardwood Floor Cleaner
  • Remove all the furniture, and spray the floor with a hardwood flooring cleaner or your own mix of 10 parts water to 1 part white vinegar.
  • Gently wipe the floor with a terry-cloth mop or a towel wrapped around a mop head.
  • Close the windows and doors to keep dust contained in the room you’re sanding.
  1. Prep the Perimeter
  • Using 180-grit sandpaper, hand-sand the perimeter of the room and any nooks that the buffer can’t reach.
  • Rub with the grain 4 to 6 inches out from the baseboard, working over each board until the finish dulls and a powder forms.

Pro Tip: Don’t use a sanding block for refinishing hardwood—it might miss uneven spots in the floor.

  1. Scuff-sand the Floor Finishing
  • Stick a maroon buffing pad to the buffer, and put on a dust mask.
  • Move the buffer from side to side across the floor in the direction of the grain, overlapping each course by 6 inches.
  • The old finish turns to powder as you go, so it’s easy to see the areas you’ve covered.
  • Keep the buffer moving at all times, but stop every 5 minutes or so and vacuum the pad.
  1. Vacuum and Tack
  • Leave the room for 10 to 15 minutes to let the powder settle.
  • Put a clean filter in the vacuum, and sweep the floor using a felt-bottomed attachment.
  • Work in line with the flooring strips, then sweep across them to get any powder that settled between the boards.
  • Finally, dry-tack the floor with a microfiber cloth pushed with the grain.
  1. Cut in Along the Edges
  • Cover your shoes with booties and your nose and mouth with a respirator that has organic vapor canisters.
  • Strain the finish through a cone filter into a clean plastic watering can, minus a sprinkler head, then pour some strained finish into a small plastic container.
  • Brush a 3-inch-wide stripe beside the baseboards at a point farthest from your exit door.
  • You’ll have lap marks if the edge of the stripe starts to dry, so stop after 10 minutes and go to the next step.
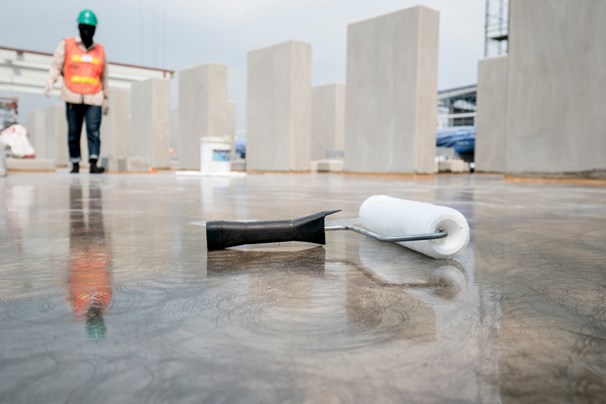
  1. Roll Out the Poly
  • Pour out a 1-inch-wide stripe of finish in line with the grain—only as much as you can spread in 10 minutes.
  • Using a long-handled roller with a ¼-inch nap cover, roll out the finish with the grain, then across it.
  • Overlap each pass and work quickly to keep a wet edge.
  • After 10 minutes, brush more finish along the edge, then pour and roll again for 10 minutes. Continue until the floor is covered.
  • Wait 3 hours before recoating and a week before putting back furniture.

Avoid Using Vinegar To Clean Hardwood Flooring

Wood-Flooring Problems and Their Solutions

I’m impressed by a surface that receives such a tremendous amount of abuse yet—when installed properly—lasts as long as a house. Installing a wood floor requires a substantial investment in materials and labor. When problems arise or when a floor fails, it can be costly. Every year, an estimated $1 billion worth of hardwood-floor damage occurs across the country

I’ve made it my business to understand what causes all that damage. The good news is that if you take your time, use the appropriate tools and techniques, and understand wood acclimation, you can create a floor that lasts a lifetime

Wood floors are prone to movement. Installed correctly, floorboards hold tight to one another during humid times of the year and might reveal gaps during drier times. Abnormal gaps are generally the result of flooring that’s too wet when it is installed (sidebar p. 80), but they also can be the consequence of installing flooring in areas of excessive dryness. I’ve worked on floors that had abnormal gaps because floorboards were installed directly over heating ducts, in areas that received a lot of sunlight, and in homes heated with woodstoves, which creates a dry interior environment.

Most often, cupping happens when flooring is installed over a wet basement or crawlspace. A vapor retarder installed between the subfloor and the floorboards can help the condition by slowing moisture migration, but it shouldn’t be relied on as a permanent solution to moisture problems.

Moisture resistant, not moisture-proof. Aquabar “B,” which is composed of two layers of kraft paper laminated with asphalt, slows the movement of moisture through a subfloor, but it doesn’t stop it. An elastomeric membrane has similar characteristics, but is best used in glue-down flooring applications


Things to Know Before Refinishing Hardwood Floors

Consider these tips before hiring a contractor to refinish wood flooring

During rainy periods and if the humidity is high, consider rescheduling the job. Wood is a porous material, and when the old finish is stripped away, the floor will absorb moisture. If that happens or if it is just very humid, the new finish will take significantly longer to dry.

Since all the furniture will be removed, the room is rendered unusable for several days. Even then, extra care is needed to avoid scratching the floors. Plan on buying rugs (not the kind with rubberized bottoms) for all entries into the room, and keep your pet’s nails trimmed.

Controlling dust is an important task. No matter what the contractor does to prevent it from spilling into adjacent rooms, he or she won’t be able to control it entirely. Protect furniture and other items that you don’t want ending up covered with a film of dust. Also, keep in mind that the odor of polyurethane will linger for a few days. It can be remedied somewhat by leaving windows open and ventilating the room, but not if rain is expected.

Research flooring contractors

You don’t have to become an expert on hardwood flooring. But it’s wise to learn enough that you can properly evaluate your contractor before, during and after the job. Developing an eye for well-installed and properly maintained floors makes it easier to spot those that are not. Visit various showrooms.

Hire the right hardwood floor refinisher

Plan to interview at least three contractors, and remember that cost is not the sole or best measure of a good contractor. Ask for and take the time to contact references. Examine a portfolio of each contractor’s work. Make sure that anyone you hire is properly insured and licensed, and that every important detail is written into the contract. Good planning and communication will make the job go more smoothly and help you avoid any bad surprises. Make sure you are given a quote instead of an estimate, and be sure to ask about what kinds of unexpected costs can crop up.


Things You May Be Doing That Can Ruin Your Hardwood Floors!

Hardwood floors can last 100 years or more with proper care and maintenance but not everyone knows all the rules. These floors are more resilient than carpet flooring, tile and and linoleum floors. You benefit aesthetically and avoid the common issues that come along with Carpet Flooring  Even so, owners can make simple mistakes that can cause damage needing professional repair. There are differences in Unfinished and Prefinished flooring care and not all cleaning products are made the same. Before you make a simple mistake check out this list of Hardwood Floor No-No’s!

Don’t pour cleaning product directly on floor

It may be tempting to create a puddle of cleaner to spread spread over your floor but this can cause the same effect of water damage Cleaning products that are liquid can be absorbed into wood, cause swelling and an uneven look over time.

Don’t Neglect your Sweeping Chores

Remember to sweep regularly, as built-up sand and dirt can act like sandpaper, scraping the gleam off of your floor. Pre-Finished floors are notorious for seams.

Don’t Style and Profile in High Heels across your Hard Woods

A hard, pointed heel is perfectly suited to ruining the finish. Remember, there is no such thing as a scratch-proof finish. It is wise to leave high heels at the door and make sure that they are always in good shape. Damaged high heels can quickly become a chisel on your wood floor. A 125-pound woman walking in high heels has an impact of 2,000 pounds per square inch. An exposed heel nail can exert up to 8,000 pounds per square inch. This kind of impact can dent any floor surface.

Hardwood Floors have a Water Phobia

Do not wet-mop a wood floor. Standing water can dull the finish, damage the wood and leave a discoloring residue. Wipe up spills immediately with a slightly dampened towel.


How to Clean Engineered Hardwood Floors (and Some Mistakes to Avoid)

Hardwood flooring often becomes the pride and joy of homeowners who are lucky to have them in their homes! They create a feeling of warm hominess that can’t be replicated with many other types of flooring.

If you want to make sure that your engineered hardwood floors stay looking and feeling like they did when you first moved in or when they were first installed, keep reading. We’re going to let you know how to clean engineered hardwood floors… along with a few common mistakes you should avoid.

Simple Steps for How to Clean Engineered Hardwood Floors

Learning the basics of maintaining and caring for your hardwood floors doesn’t need to be super complex! You might see articles out there advocating for almost constant cleaning, expensive specialty products, and almost unattainable perfection with your floors

Clean Dirt and Debris Regularly

One of the main things to note with maintaining and cleaning engineered hardwood floors is that consistency is key. Now, don’t worry, this doesn’t mean scrubbing on your hands and knees every day!

Damp Mop

Running a damp mop over your engineered hardwood floors will pick up any set in dirt or debris that your vacuum, broom, or cloth couldn’t get. However, be careful with this step. When we say “damp” we don’t mean sopping wet.


What Are the Benefits of Hardwood Floors?

Easy to keep clean

Hardwood floors are incredibly easy to keep clean. You can sweep, steam-clean, and vacuum the floors to keep them looking and feeling good.  And unlike carpet, wood floors don’t hold on to dust mites or pet dander

Hypoallergenic

Because of the ease of cleaning and the ability to deep clean, hardwood floors are great for people that have allergy issues

Strong & Durable

Why do many homeowners choose wood flooring?  Because it’s durable.  Wood floors can handle the wear and tear of daily living.  Wood floors can get scratched or dented, but if taken care of properly, can last many years.

Adds Value to Your Home

Wood floors can add value to your home. Buyers are often willing to pay more for a home that has wood flooring than any other type of flooring. Other floorings just don’t have the luxurious feel of hardwoods.  Because it’s a feature sought out, wood flooring may even help sell your house faster.

Can Be Refinished

As we mentioned before, wood flooring is easy to keep clean and is durable. Wood flooring also gives you the ability to make your old flooring new again.  Do you have some dents and scratches?  You can refinish the floors.  Want a different look or a different color?  Refinish the floors. The cost to refinish is significantly lower than buying and installing new flooring. You can make a fairly drastic change in your home without spending a lot of money.

Seamless Epoxy Flooring Provides Durability And Aesthetics

How To Prep Your Floor For An Epoxy Coating

So you’ve decided to get an epoxy flooring for your brewery. Now all you need to do is apply the epoxy flooring properly. While this is a simple task, there are several things that need to be done to guarantee your floor comes out just the way you envisioned it

BEFORE APPLYING EPOXY

The absolute first step before applying your epoxy coating, is to prep your floor. It is essential that you clean your floor thoroughly. If you’re working on a concrete base, fill in any cracks or patch areas that need care before you start to clean. Once the damages, if any, have been repaired, it’s time to clean. Be sure to catch any areas you might overlook while preparing your epoxy coat. Oil spots will need to be removed and the floor will need to be degreased. Your floor is cleaned properly and you will want to make sure you vacuum thoroughly to rid of any remaining dust and debris.

The biggest problem you will encounter when applying your epoxy coating, is to make sure the moisture and humidity are in the right conditions. Conducting a moisture test on your concrete base is a reliable way to make sure the epoxy flooring will be applied properly. This can be done cheaply and effectively by taping shut a plastic sheet to your floor. After a day or so, you’ll notice if moisture has appeared or gathered underneath the plastic surface. If it has, you will need to apply a moisture blocking sealer. This is due to the fact that epoxy can be impossible to work with in high moisture conditions and will not guarantee a sealed floored. If the floor is not sealed properly then epoxy may not adhere causing the floor to bubble.

METHODS

There are three main methods for preparing your floor for epoxy work, so take your pick on which one will best suit your needs.

The first is acid etching.  This technique is the most D.I.Y. option, as other techniques require machinery or skill. And is best used for concrete bases. First you need to apply the acid solution to your floor. Once it is spread out evenly use a scrubber, a stiff bristle broom, or a similar tool to work the acid solution. Once that it’s done, let the acid sit for up to 10 minutes, this will allow the process to take effect. Next you have to remove the spent acid. This can be done through power washing and then vacuuming once the floor has dried. Make sure to remove the residue before the acid dries. Finally you’ll need to neutralize any remaining acid residue. Using a diluted solution of simple green will work well on most floors (approximately 4oz per gallon of water


Tips for Maintaining Epoxy Flooring

I mop the epoxy flooring two or three times each year. Occasionally, I vacuum up debris with the shop vac, but everything else is just spot cleaning. It’s not much work to have a floor that is visually attractive and welcomes guests. Compare that to most other garages that have stains, concrete wear, dusting and other issues. You get the picture.

Whether you have professional epoxy coatings for your garage, basement, porch, sunroom or pole barn, the maintenance and usage tips are usually the same

For minor spills or vehicle drippings, simply wipe them up with a paper towel or other soft cloth.

Routine maintenance cleaning is best achieved with either a soft bristle broom or a blue commercial dust mop (available at any home improvement store).

For heavy cleaning of a soiled epoxy floor, sweep away any loose debris and then mop floor with a hard foam mop, hot water and clear ammonia. Four to five ounces of ammonia per gallon of water is all that is needed to adequately remove soiling

Some winter road “pre-treatment” compounds leave a hazy film on epoxy floor coatings after cleaning. This can normally be removed with hot water and a deck brush (found at most hardware stores). Continuous rinsing may be required to keep the compounds from drying onto new areas of the floor.


What is epoxy flooring?

Epoxy coating is a mix of polymer resins and hardeners. When applied to concrete flooring, epoxy creates a smooth, shiny surface that brightens the space. The durable and visually stunning finish makes it suitable for most residential and commercial applications

If you’re looking for suitable flooring types for your home, epoxy flooring should be high on your list. It’s impervious to most chemicals and has antimicrobial properties. It can also mimic the elegant feel of marble while maintaining the hardiness of concrete

Understanding epoxy floor coatings

Epoxy coating can be roughly divided into three types: solvent-based, water-based and 100% solid epoxy. More recently, you can find pre-tinted or metallic coatings, as well.

Solvent-based epoxy is the oldest type. It’s a mix of resin with a high concentration of solvent-based hardener. When left to evaporate after application, mixed resin and hardener generate toxic vapours, such as ammonia and carbon monoxide. To protect yourself from the fumes, wear a respirator during and after application

Next, you have water-based epoxy. It produces the same glossy finish as solvent-based epoxy but is soluble in water, so there’s no need for solvent hardener. It doesn’t leave harmful fumes but creates a sturdy, non-toxic, waterproof surface.


Epoxy floor paint tips and tricks that can save time and money

Over the past 40 years of installing epoxy and urethane floor seals and coatings on Fortune 500 company concrete floors, as well as basements, garages, and decks, a few tricks have been learned. These tricks can help you avoid making mistakes that can limit the life of your floors and require re-coating or repair.

Plan the job. Save trips to the store and costly delays by getting everything you need ready before the job starts. One quick step would be to go to a website like www.concrete-floor-coatings.com/costanalysis.aspx for a free cost analysis which will list everything you need to do your job including step-by-step instructions.

Stick your coating to something that is not going to move. Remember that a floor that has 3,000 lb. or more going over it every day needs much better adhesion than a wall that may get brushed by an elbow occasionally. Stick your coating to something that is not going to move.

The better the tools the less work you have to do. Renting power scrubbers, walk-behind vacuums, double-bladed squeegees, and long-handled scrapers are all multipliers that reduce your work and increase your performance. You can do without lots of fancy tools but you could end up stopping your project earlier than you should because its just too much work

Some things must be abraded off. Gum, adhesive, asphalt, some paints, concrete splatters, silicone sprays from Rain X or tire shine are just some of the things that you may need to scrape or grind off by hand when doing a floor job.


Getting Creative with Epoxy Floor Coatings

Getting Creative with Epoxy Floor Coatings It is no secret that we all want our homes, businesses, and garages to reflect our unique styles and personalities! Epoxy coatings allow many of us to transform our standard home and business floors into areas that leave people wanting more! The best part about these coatings is the fact that they resist all types of common and uncommon damages, so your floors will continue to be beautiful and unique for years to come. Modern Epoxy Floors Excite People With resin floors, you can install a

Must Haves For Millennial Home Buyers Finally, we are starting to see the general population of Millenials starting to take the first big leap into becoming adults, home buying. But, in the current market, the homes we love are out of our price range so its time to start thinking about what we need in our beginner homes to make the push to a bright future as easy and comfortable as possible. We get it, there hasn’t been much knowledge from many sources about what you should look for in your home and possibly what you can

Pool Safety Tips For Your Family This Summer Now that summer has started, it may be settling in that you need to make sure that you and everyone using your pool are as safe as possible so you can kick back and enjoy your pool this year. Pool safety is one of the biggest factors that should play a role in your home every summer. Did you know that between 2005-1024 alone there was a total of 3,536 unintentional deaths that were pool-related? That is relative to about 10 deaths a day from backyard pools alone! With

Industrial Concrete Has Become A Trendy Decor Element Do you wish that there was a way to get the modern industrialized look into your home without having to spend thousands of specialized metal trims, industrial banisters or light fixtures? Well, even though industrial is the going trend, there is a way to get the industrial look with a price tag that looks even better than the look itself, concrete. No matter what is going on in the interior design cliche, concrete is always going to be affordable on any budget and is the easiest way possible to

The Correct Way To Resurface A Concrete Floor Has your concrete floor seen better days? Cracks, gouges, and stains can put a massive damped on the curb appeal and even the performance of your concrete flooring system. Where the adverse effects of aged and working-class concrete can have you scrambling for your local concrete contractor to plan the replacement of the entire slab, we think you should hold off until you read about a time and money-saving process known as concrete resurfacing. We get it, not many people are knowledgeable in working with concrete and that is

Tips To Apply Hardwood Flooring In Your Bathroom

What makes for the best engineered wood flooring?

Wear Layer

A quality engineered wood flooring is constructed of multiple layers that are stacked in a cross structure. It is this structure that gives the best engineered wood flooring its strength and durability. The top layer of the board is commonly known as the ‘Wear layer’ and is 100% solid hardwood. You can find some cheaper ranges where this layer is made up of a number of strips of wood. However if you are looking for a traditional and quality looking board then we would suggest choosing a ‘single strip’ wear layer which is made up of one section of timber. When comparing boards, you will see that the wear layer differs in thickness between ranges. The thicker the wear layer the more times the board can be sanded back in years to come and the longer the life expectancy.

Under-core

The under-core is the term used for what lies beneath the oak and although it’s something you are never going to see, it is still one of the most important factors to consider in identifying the best engineered wood flooring. This is the part of the board that determines how stable the engineered wood floorboard is. Under-cores can vary in quality but a high quality board will have what is known as a multi-laminate hardwood ply. Plywood is used extensively in the building trade and is well known for its strength and stability due to its cross layered construction. Many cheaper engineered wood flooring ranges are made up of a ‘block board’ type under-core (only 1 or 2 layers). This type of engineered board is slightly cheaper but is certainly not as stable and reliable as a multi-laminate ply. Choosing a good quality under-core is particularly important if you intend to install or have installed an underfloor heating system, or are laying the boards in an area that is prone to changes in heat or humidity. Choose a board with a plywood core as their strong cross-layered structure will make the boards far less prone to swelling or shrinking.

Dimensions

Engineered wood floor boards come in a wide range of lengths and widths, all of which create different effects when fitted. There is neither ‘right’ nor ‘wrong’ when choosing a board with the dimensions that will suit your property, it is purely personal preference. However there are a couple of factors worth considering. Shorter and narrower floorboards are always cheaper to purchase and can often be a way in which to save money without cutting back on the overall quality of the board itself. Some also consider a narrower shorter board to have a more traditional and less contemporary feel to them and therefore can be more suited to certain types of property. However this again is very much down to personal tastes.

Maintenance

If you use a high quality treatment such as Treatex hardwax oil your floor will be much easier to maintain and look after. This high quality, tried and tested product will not only help to protect the boards from scratches, scuffs and stains, it will also enhance the natural features of your real wood flooring – making even the best engineered wood flooring look even better. Real wood will naturally fall victim to scuffs and scratches and nothing can prevent this 100%, but Treatex have a number of maintenance products to help you replenish any imperfections that may be caused to your floor over the years.


Why Engineered Hardwood Flooring is a Smart Choice

Engineered wood flooring is designed for greater structural stability and stands up better than other types of flooring.

Some of the other reasons that make engineered wood flooring at top choice include:

  • Their ability to remain stable and flexible enough to be used on top of concrete/radiant floor heating.
  • Easier installation process
  • Ability to get wider planks which means fewer joints across your floor
  • A more environmentally sustainable
  • Typically, less expensive than solid planks

Engineered flooring will range in thickness. The top layer will be your desired wood. When you choose engineered flooring with a top layer between two and six millimeters in thickness, you have the option to refinish it as desired. So, when you are searching for an engineered wood floor, it is a good idea to find out how it’s made, in addition to how the top layer will look in your space. For the best results, you want a high-quality engineered hardwood flooring with a thicker top layer that allows you to refinish the wood to match your design requirements.


Shiny and subdued finishes

Like traditional hardwood floors, engineered floors rely on a hardwood finish to seal the wood and to increase its lifespan. Since almost all engineered hardwood flooring comes prefinished, you’ll want to make sure the type you choose best fits your décor.

If you’re already thinking ahead to your next home renovation, engineered hardwood flooring can withstand a few rounds of sanding, restaining, and refinishing. This type of flooring isn’t designed for endless renovations, however, and options with thinner wear layers might only be able to handle one round of refinishing.

  • High Gloss: The shiniest type of finish, glossy floors give your space some serious shine. If you’re designing to impress, like to keep your interior clean, and don’t expect significant wear, a glossy floor is a smart choice in a living room, family room, or bedroom. 
  • Matte: This finish might not have the sparkle of glossy floors, but the finish surface works well for hiding scratches. If your household includes kids, dogs, or both, matte-finish floors make a great choice in any room.
  • Semi-Gloss: The perfect balance between the two, semi-gloss finish has enough shine to look attractive, but not too much that the floor will require refinishing often.


HOW TO SELECT ENGINEERED HARDWOOD FLOORING?

Here are some features that you need to know before choosing an engineered wood floor that will complement your home style and décor:

  1. Type of Wood
    Engineered wood offers plenty of choices. Some of the wood species you can select from are: Oak:It provides you with a reddish undertone and is the most stable among the wood flooring options. For average wear and tear, oak is a good choice; Maple:If you expect extensive foot traffic, maple is a good choice. Known for its durability and natural color, it works well in kitchens, mudrooms and other areas; Hickory:As this species resists moisture, it can be used in places such as kitchens, which experience temperature fluctuations and significant foot traffic.
  1. Wood Thickness
    Engineered hardwood floors differ in thickness. They usually have three layers that are cross-stacked, fixed and compressed together. High-quality flooring has several layers that are about three-quarters of an inch deep. Each layer serves a purpose. If you’re contemplating a kitchen renovation, the wear layer or lamella is very important and has to be thick to match the refinished floors.
  2. Core Layer
    If you’re looking for a flooring material which provides long term endurance and stability, choose the core layer wisely. Plywood offers comfort, durability and works best for most flooring needs. HDF is assembled with alternating layers of plywood, making it rigid and durable.
    You can also add surface effects to your floors to enhance their texture.
  • Hand Scraped:These floors are scraped by hand or machine to give it a distinct look. Due to the heavy texturing, they’re perfect for households with a lot of foot traffic.
  • Wire Brushed: Wire brushed provides you with a textured look without any heavier markings.
  • Smooth: Smooth surface effect gives a clean and sleek look. It does not go well with major foot traffic.


A Durable Choice

Engineered hardwood flooring is just as durable – and in some cases more durable – as solid hardwood flooring. Available in a wide range of wood species, finishes, and stains, you can find an engineered hardwood that meets your performance needs wherever you intend to install it, and no matter what your building’s needs are. Consider installing engineered hardwoods in your office building or retail location to get a truly durable and exceptional flooring choice that meets all of your needs.

© 2024 Prodezign