All You Need to Know About GFCI Outlets
What is a GFCI Outlet?
A ground fault circuit interrupter is a protective device specifically designed to break the circuit every time there is an imbalance between incoming and outgoing current. The GFCI outlet protects electrical wiring and receptacles from overheating and possible fire, greatly minimizing the risk of shock injuries and fatal burns. It also detects ground faults and disrupts the flow of current but should not be used to replace a fuse as it does not offer protection against short circuits and overloading.
How does a GFCI Outlet work?
The GFCI is integrated in the electrical outlet and constantly tracks the current flowing in a circuit to sense fluctuations in real-time. It has three holes: two of the holes are for neutral and hot wire and the third hole in the middle of the outlet serves as a ground wire. If it detects any change in the electrical flow in the circuit, it will immediately cut off the flow of electricity. So, if you are using a hair dryer for instance and it slips into a sink that is filled with water, the GFCI outlet will immediately sense the interruption and cut the power to ensure electrical safety in the bathroom and beyond.
Where is a GFCI Outlet Needed?
GFCI outlets are important, especially when the electrical outlets are positioned close to water. Installing GFCI outlets in your kitchen, bathrooms, laundry rooms, pool house etc., is a good idea. Apart from being an essential preventive measure, the law also requires you to have GFCI outlets installed throughout your home. According to National Electric Code (NEC), all homes must be equipped with GFCI protection. Initially, it was only required for you to install GFCI outlets near water but this requirement has been extended to cover all single phase outlets of 125 volts in recent years. GFCI outlets should also be installed on temporary wiring systems during construction, renovation or maintenance of structures that are using power temporarily.
Easy Steps For GFCI Outlet Installations
I didn’t prepare this GFCI outlet installation guide in 4 easy steps for conditions where everything is perfect and nothing can go wrong. That’s why it is a little longer than others.
GFCI – (Ground Fault Circuit Interrupter)
So don’t start installing GFCI without reading description of items 1-4, it’s extremely important for your safety.
- Disconnect power supply to the electrical outlet you are planning to remove and install GFCI receptacle Its place. The safest method is to turn off the main breaker in the electrical panel or remove the main fuse
- Remove wires from an old electrical outlet
- Correctly install wires on the new GFCI receptacle terminals
- Secure the new GFCI receptacle in place, install GFCI receptacle cover plate and test installation
The minimum required tools for this 4 step GFCI outlet installation are:
- The table lamp – for testing (or some other devices like those on my picture)
- The screwdriver (flat and Philips recommended)
- Electrical tape – to insulate GFCI receptacle terminals
- Electrical pliers and wire strippers – this might not be necessary, but in some cases it will make this GFCI installation much easier
- Wire nuts and 6″ of #14 or #12 copper wire – if some slightly more advanced testing or installation is necessary
Replacing a GFCI Outlet Yourself
Replacing an existing outlet at the end of a circuit (as explained above) is not particularly difficult, but the task requires some experience. You should understand how outlets are wired and how electrical current travels from the breaker panel through each electrical circuit (wiring loop) in your home. Some communities prohibit homeowners from doing their own wiring, so check with your local building authority before you start.
STEP 1:
Shut off the power to the outlet by turning off the circuit breaker (at the breaker panel) that provides electricity to the outlet. A good way to ensure that the power is off is to plug a nightlight into the outlet and turn it on, then shut off the breaker. If the nightlight does not go off, you’ve got the wrong breaker—try again.
STEP 2:
Remove the outlet cover with a flat screwdriver. You’ll probably need a helper to hold a flashlight for you now, since the overhead light might also be off.
STEP 3:
Remove the old outlet from the outlet box using a Phillips screwdriver. The outlet is typically held in place by two screws at the top and two at the bottom. When the screws are removed, the outlet will hang freely—the only things holding it are the attached wires.
STEP 4:
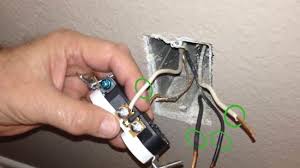
Remove the three attached wires, which are held in place with Phillips screws. Note the color of the screws and the color of the wires.
Black (hot) wire connects to a brass or gold screw on one side.
White (neutral) wire connects to a silver screw on the opposite side.
Green or copper (ground) wire connects at the bottom of the outlet to a green screw.
STEP 5:
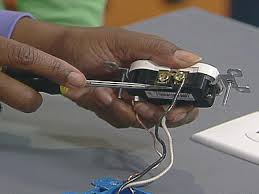
Attach the new GFCI outlet in the same way you disconnected the old outlet, making sure the wires attach to the screws using the above color-coded method. The GFCI outlet will also have two additional screws on the bottom sides, and these screws will be covered by a piece of tape. Leave the tape in place—these screws are for use by an electrician who is replacing an outlet in an advanced wiring situation.
STEP 6:
Fasten the new GFCI outlet to the outlet box with Phillips screws (use the same holes).
STEP 7:
Position the new GFCI outlet cover over the outlet and attach it with flat screws. A new outlet cover is necessary because the cover of a standard outlet will not fit a GFCI outlet.
STEP 8:
Turn the circuit breaker back on.
STEP 9:
Press the “Reset” button on the front of the GFCI outlet to turn it on and plug the nightlight in to test it.
STEP 10:
Leave the nightlight in and then press the “Test” button. The nightlight should go off, which tells you that the GFCI outlet is working as intended. If it’s not working, it’s time to call the electrician.

What is a Ground Fault?
A “ground-fault” represents any electric path between a source of current and a grounded surface. A ground-fault occurs when current is “leaking” and escaping to the ground. How this occurs is significant. If your body provides a path to the ground for this leakage, you could be injured, burned, severely shocked, or electrocuted. Since water conducts electricity, ground-faults are especially common in areas where water can provide a conduit for electricity to “escape” and find an alternate path to the ground.
Self-Testing Your Ground Fault Circuit Interrupter
It is recommended that GFCI outlet should be tested every month and replaced every decade. You can follow these simple steps to test if the circuit interrupter is working properly:
- The face of the GFCI outlet features two small buttons that are labeled test and reset. Simply press the test button and this will trigger a snap sound which indicates that the outlet has tripped.
- Once the power trips, you can check the efficiency of the GFCI unit using a voltage meter.
- Now plug in a device into the outlet and when it stops working, press the test button so you can be sure of the safety mechanism.
- Once you know the CFGI outlet is working at peak efficiency, you can press the reset button and the circuit interrupter will be turned on once again.
While these DIY instructions are easy-to-follow, they do require that you are familiar with and understand the functioning of your home’s electrical system. It is always recommended to work with a certified electrician who can ensure that your system is in compliance with relevant codes so your home remains guarded against electric fires.